
A beautiful stone veneer project can completely transform a space. But a few common mistakes can turn that dream into a costly repair job with cracking or peeling stone. The good news? You don’t need to be a master mason to get a professional result. It’s all about knowing what not to do. We’ll cover the most frequent errors, from poor surface prep to improper sealing. Follow these tips for a successful veneer stone installation, and you’ll have a feature that looks amazing and is built to last.
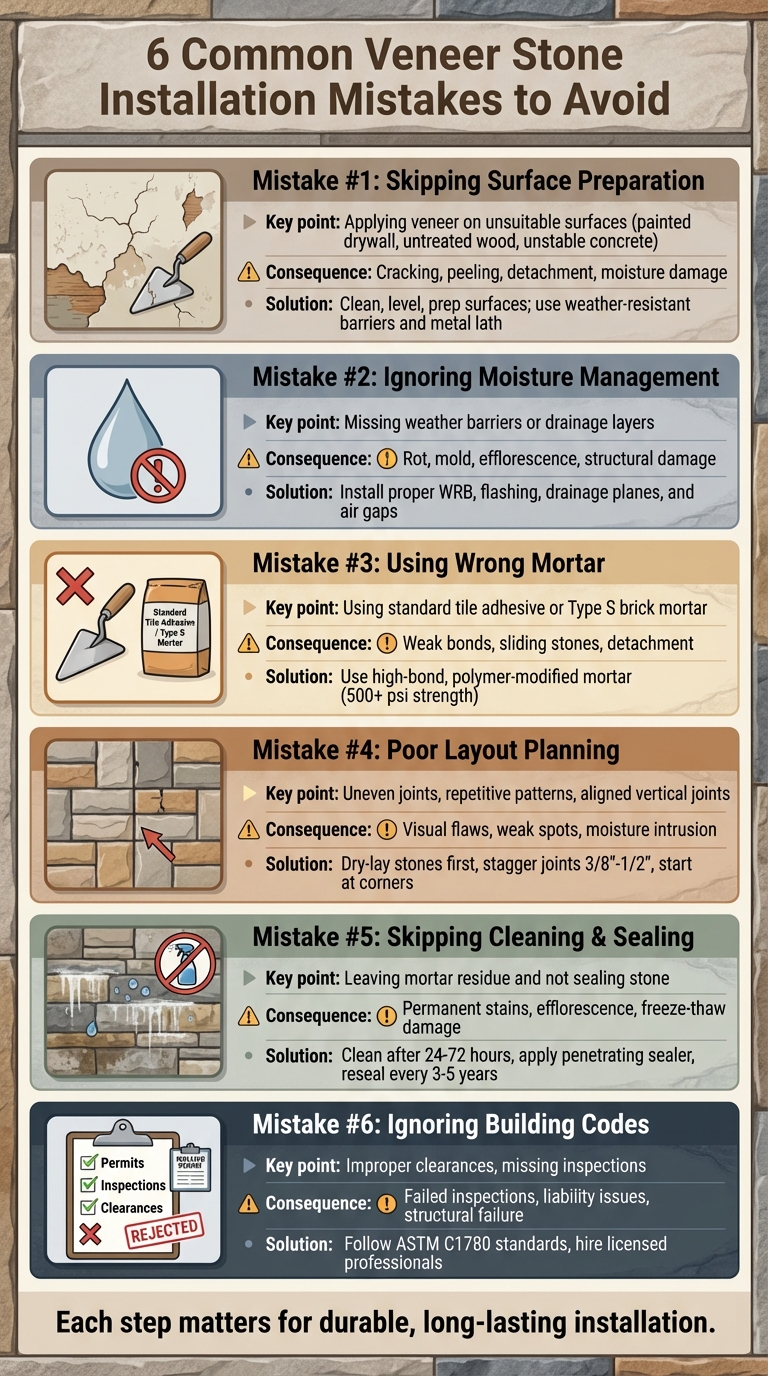
- Skipping Surface Prep: Applying veneer on unsuitable surfaces like untreated wood or painted drywall can cause detachment and moisture damage. Always clean, level, and prep surfaces properly.
- Poor Moisture Management: Missing weather barriers or drainage layers leads to mold, rot, and efflorescence. Use water-resistant barriers and proper flashing.
- Wrong Mortar Choices: Using incorrect or poorly mixed mortar weakens bonds. Opt for high-bond, polymer-modified mortar for strong adhesion.
- Bad Layout Planning: Uneven joints, repetitive patterns, and misaligned corners ruin aesthetics and structural integrity. Dry-lay stones and stagger joints for a polished look.
- Skipping Cleaning/Sealing: Residual mortar and unsealed stone invite stains, moisture, and damage. Clean thoroughly and seal with a breathable stone sealer.
- Ignoring Building Codes: Overlooking clearance rules or proper installations can lead to failures and liability issues. Follow ASTM standards and hire professionals when needed.
Each step in the process matters. Proper preparation, moisture control, material selection, and adherence to codes ensure a durable, visually appealing installation. For complex projects, hiring experienced contractors can save time and prevent long-term problems.
6 Common Veneer Stone Installation Mistakes to Avoid
6 Common Stone Veneer Installation Mistakes to Avoid
Understanding the Basics of Stone Veneer
Before you start picking out colors and textures, it’s helpful to know that stone veneer comes in a couple of different forms. The type you choose impacts everything from the installation process to the structural needs of your project. Understanding these differences is the first step to ensuring your new feature looks great and lasts for years. It helps you have a more informed conversation with your contractor and ensures you select the right material for the job, whether you’re updating a fireplace or building a brand-new outdoor living area from scratch.
Thin Veneer vs. Full-Depth Veneer
The main distinction between stone veneers comes down to thickness and weight. Full-depth stone veneer is the heavier option, typically around three to five inches deep. It’s designed to mimic the look of a solid, structural stone wall and is often used for building new walls or home exteriors. On the other hand, thin stone veneer is usually less than an inch thick, making it much lighter. This type is perfect for decorative applications where you want the look of stone without adding significant weight, such as on an outdoor kitchen island, a fireplace surround, or an accent wall.
Structural Requirements for Full-Depth Veneer
Because full-depth veneer is so much heavier, it requires significant structural support. The installation needs a solid concrete footing or ledge to rest on, which prevents the stone from sinking or shifting over time. A proper setup also includes a small air gap behind the stone for drainage and a weather-resistant barrier to keep moisture from getting into the underlying wall. These requirements make it a more complex and technical installation that’s best handled by experienced professionals who understand the structural demands and local building codes for a safe and durable result.
Key Limitations: Where Not to Install Stone Veneer
While stone veneer is incredibly versatile, it’s not the right choice for every situation. Its primary role is decorative, meaning it cannot be used to support any weight. You can’t build a load-bearing wall with it; it must always be applied to an existing, stable structure. It’s also important to avoid installing it in areas that will have frequent contact with harsh chemicals. For example, constant exposure to de-icing salts or pool-cleaning chemicals can degrade the material and cause discoloration or damage over time, so you’ll want to consider other materials for a pool deck surface.
Veneer is a Decorative Finish, Not a Structural Support
Think of stone veneer as the beautiful finishing touch on a project, not the foundation of it. It isn’t inherently waterproof and relies on a properly prepared and sealed structure behind it to prevent water damage. Before any stone is applied, the underlying wall must be sound and meet all local building codes. Following these guidelines, which are outlined by organizations like the International Code Council, ensures the entire system works together to protect your home while providing the timeless look of natural stone. This is why a thorough plan, like our 2D/3D designs, is so important before starting.
Mistake #1: Skipping Crucial Surface Prep
Skipping proper surface preparation is one of the most common – and costly – errors in veneer stone installation. Many DIYers make the mistake of applying veneer stone to unsuitable surfaces, leading to issues like cracking, peeling, or trapped moisture. These problems can result in mold, rot, and expensive repairs down the line.
The Real Cost of Skipping Surface Prep
Using surfaces like painted drywall, unstable concrete, or untreated wood can prevent proper mortar bonding. This often leads to cracks and detachment, especially in humid or wet conditions.
Unstable concrete may not hold the weight of the stone, causing sections to fail and creating potential safety hazards. Untreated plywood, on the other hand, absorbs moisture, which can make it swell or rot. Many repair calls for stone veneer installations stem from these kinds of preparation errors, often requiring complete tear-offs and reinstallation. In extreme cases, applying veneer stone directly to plywood can result in total detachment when the wood swells.
For exterior projects, water penetration can wreak havoc on wood framing, leading to structural damage. These types of repairs are typically far more expensive than simply preparing the surface correctly in the first place. This underscores the importance of taking the time to prep properly.
How to Properly Prep Your Surface for Stone Veneer
Start by inspecting your surface to ensure it’s structurally sound, level, and free of any flexing, crumbling, or loose material. Clean off any paint, dirt, grease, efflorescence, or loose finishes, and patch any visible cracks. The goal is to create a clean, rough, and absorbent surface that can hold a strong mortar bond.
For wood-framed exteriors, avoid applying veneer stone directly to plywood or OSB. Instead, install a weather-resistant barrier, add a corrosion-resistant metal lath, and apply a scored scratch coat of mortar. Some manufacturers even recommend using cement backer board paired with a liquid air-and-water barrier. For example, Stoneyard advises applying two coats – each between 15 and 22 mils thick – before installing thin stone veneer.
When working with concrete or masonry surfaces, clean them thoroughly using a wire brush or pressure washer to remove contaminants and smooth finishes. Roughen any overly smooth areas to improve adhesion. While direct bonding to sound concrete is acceptable in some cases, applying a fluid-applied barrier is a smart choice for high-moisture or exterior applications to ensure long-term durability.
For homeowners in Orange County, CA, partnering with Pacific Pavers can help ensure compliance with local codes and address the unique challenges posed by Southern California’s climate.
Applying and Curing the Scratch Coat
Think of the scratch coat as the essential primer for your stone veneer project. It’s a layer of mortar applied over the metal lath that serves two critical functions. First, it creates a rough, grippy surface that helps the stone adhere securely, preventing any slipping or detachment down the road. Second, it plays a vital role in moisture management, creating a barrier that helps control water behind the veneer. According to the experts at RCP Block & Brick, this step is absolutely essential for a proper bond and to manage moisture effectively. Rushing or skipping this stage is a recipe for future headaches like peeling or water damage, so it’s worth taking the time to get it right.
To get started, you’ll need to mix your scratch coat. A standard recipe is one part Type S Masonry Cement to about two-and-a-half parts sand. Add water slowly until you have a thick, paste-like consistency that’s easy to spread but won’t drip off your trowel. Apply a 1/2 to 3/4-inch layer of this mixture evenly over the metal lath. Once it’s on, take a notched trowel and lightly rake it horizontally across the wet mortar. This creates shallow grooves, or “scratches,” which is where the coat gets its name. As noted in this full-depth veneer installation guide, these grooves significantly improve the mechanical bond between the scratch coat and the stone veneer you’ll apply next.
Applying the scratch coat is only half the battle; letting it cure properly is just as important. This isn’t a step you can rush. The scratch coat needs to dry slowly and evenly to develop its full strength. To do this, you’ll need to keep it moist for several days after application. You can gently mist it with water a few times a day, especially in warm or dry climates like we have here in Southern California. As professionals at Casa di Sassi point out, proper curing is what prevents the coat from cracking and ensures a rock-solid bond. Skipping this can lead to a weak foundation for your stone, which completely undermines all your hard work.
Mistake #2: Overlooking Moisture Control
Overlooking moisture management can lead to serious issues like rot, mold, and even complete installation failure. Even with a well-prepped surface, failing to control moisture beneath the stone can result in efflorescence – those white, powdery deposits on the stone’s surface – and signal water migration through the stone or mortar. As water moves, it dissolves salts, leaving them behind as it evaporates, which is often the first visible warning sign of trouble.
How Water Can Ruin Your Stone Veneer
After surface preparation, getting moisture control right is essential. Skipping key waterproofing steps can cause major problems. For instance, missing or improperly installed weather-resistive barriers (WRBs) can expose wood sheathing to moisture, leading to swelling, rot, and eventual stone detachment. Installing veneer directly over plywood or OSB without a proper cement board and an air/water barrier is a disaster waiting to happen. Once the wood absorbs moisture and swells, the stone simply falls off.
Another frequent mistake is not creating a drainage plane or air gap behind the veneer. Without this, water gets trapped against the substrate, with no way to escape. Casa di Sassi highlights that poor sealing can allow moisture and even insects to penetrate between the stone and substrate, potentially causing mold, infestations, and structural damage.
Keeping Moisture Out: The Right Techniques
A proper moisture management system involves multiple layers, starting from the interior and working outward: interior finish, structural framing, exterior sheathing, weather-resistive barrier, optional drainage mat or rainscreen, lath or cement backer board, mortar scratch coat, and finally, the veneer stone. In areas prone to moisture, it’s crucial to install cement board over plywood and apply two coats of an air and water barrier. For example, Stoneyard recommends two coats of Laticrete MVIS Air & Water Barrier applied at 15–22 mils wet thickness per coat before installing the stone.
Pay close attention to flashing details. Failing to install proper flashing around windows, doors, and other penetrations allows water to seep into the wall cavity. The WRB must overlap the flashing, not sit behind it, ensuring water is directed out of the wall assembly. Around windows and doors, leave a continuous gap where the stone meets the frame. Fill this gap with backer rod and sealant rather than packing it with mortar, which tends to crack and leak. For penetrations like light fixtures, hose bibs, and vents, tightly wrap or seal the WRB to sleeves or boxes, using compatible flashing tape or sealant to maintain a continuous moisture barrier.
For homeowners in Orange County, CA, especially those working on outdoor kitchens, fire features, or retaining walls with veneer stone, hiring experts like Pacific Pavers ensures that waterproofing, flashing, and drainage systems meet local codes and are tailored to Southern California’s climate. Properly installed layers not only protect your project but also keep it looking great for years to come. A solid moisture management plan sets the stage for successfully tackling the next steps in your installation process.
Weather and Temperature Considerations During Installation
Beyond managing water with barriers and flashing, the weather on installation day plays a huge role in your project’s success. It’s easy to think a sunny day is perfect, but extreme heat, cold, or high humidity can seriously compromise how the mortar cures. If the mortar doesn’t cure correctly, the bond between the stone and the wall weakens, which can lead to stones loosening or falling off over time. Planning your installation around the weather forecast isn’t just a suggestion; it’s a crucial step to ensure a durable, long-lasting finish that stands up to the elements.
Most manufacturers recommend that the ambient temperature stay above 40°F during and after the installation to allow for proper curing. For instance, Eldorado Stone advises against applying veneer when it’s colder than 40°F. On the flip side, working in direct, intense sunlight can cause the mortar to dry out too fast, preventing it from hydrating and bonding correctly. While Orange County has a generally mild climate, it’s still important to avoid those chilly winter nights or intense summer heatwaves during installation. Scheduling your project during periods of mild, dry weather gives your stone veneer the best possible start.
Mistake #3: Using the Wrong Mortar Mix
While preparing surfaces and managing moisture are crucial steps, selecting and applying the right mortar is just as important for a durable installation. Many installers mistakenly use unsuitable mortars, like standard tile adhesive, Type S brick mortar, or pointing mortar. These options often lack the necessary bond strength and flexibility for vertical veneer applications. The result? An installation that may fail within months or slowly deteriorate over time. This misstep compromises adhesion and sets the stage for several problems.
Why the Wrong Mortar Spells Trouble
When mortar not designed for veneer stone is used, issues can arise almost immediately. Stones may slide or sag, creating uneven courses and widened joints, especially before the mortar cures. You might notice hollow sounds when tapping the stones, signaling voids from incomplete mortar contact. Early warning signs include minor slippage, visible mortar drool lines, or stones that wiggle when touched. Over time, these small problems can snowball – stones may fall off, joints can develop visible cracks, and efflorescence (a white, powdery residue) may appear as water seeps through compromised mortar.
Improper mixing can make matters worse. Under-mixed mortar often contains dry pockets of cement and aggregate, leading to weak spots and voids. Retempering – adding water to partially set mortar – can break down early cement bonds, resulting in soft, dusty joints with poor adhesion. Spot bonding, where only a few blobs of mortar are applied instead of full coverage, creates large voids that trap moisture. If that water freezes, it expands, putting stress on both the mortar and the stone.
How to Select and Apply Mortar Like a Pro
For installations on concrete or CMU walls, a polymer-modified masonry veneer or high-bond thinset mortar is the way to go. These mortars are specifically designed for stone veneer and exterior use. For framed walls with cement backer board, a similar high-bond, freeze–thaw–resistant mortar is essential. Avoid using standard brick mortar or tile mastic, as they lack the strength and polymer modifications needed to hold heavier veneer stones on vertical surfaces. A good example is Laticrete Hi-Bond Masonry Veneer Mortar, which offers a compressive strength of 500 psi and is engineered for veneer applications.
In colder or wetter regions, select a mortar rated for exterior exposure and freeze–thaw durability. Mixing and application techniques are equally critical. Combine clean, cool water with dry mortar according to the manufacturer’s directions, mixing until the consistency is smooth and lump-free. Many veneer mortars require a slake time – usually 5 to 10 minutes – after the initial mix. A brief re-mix without adding water ensures the cement and polymers fully hydrate, maximizing bond strength. Be precise with water measurements; too much water can weaken the mix, making it chalky and unable to support the stone.
To ensure proper adhesion, apply a fresh layer of mortar to the wall and back-butter each stone with an even coat before pressing it into place with a slight wiggle. This eliminates air pockets and ensures full contact between the stone and mortar. Work from the bottom up, supporting heavy or large stones until the mortar sets to prevent sliding. Avoid working in extreme conditions – heat and direct sun can cause rapid drying, while cold temperatures can slow hydration or risk freezing, both of which weaken the mortar.
For climates like Orange County, CA, professionals such as Pacific Pavers ensure that the mortar selection and application meet local standards. Experienced installers focus on maintaining consistent mortar thickness, achieving full coverage, and allowing for proper curing. These steps are critical to preventing slippage and ensuring a strong, long-lasting bond before moving on to layout and joint planning.
sbb-itb-11ea599
Choosing the Right Mortar Type
Think of mortar as the glue holding your beautiful stone veneer in place—using the wrong kind is like using a school glue stick for a heavy-duty construction project. Standard brick mortar or tile adhesive just won’t cut it. These products don’t have the specific properties needed to support the weight of stone on a vertical surface, especially outdoors. For a strong, lasting bond, you need a polymer-modified veneer mortar. These specialized mixes contain additives that increase flexibility and adhesion, helping the stone withstand temperature fluctuations and moisture without cracking or failing. Always check the product specifications to ensure it’s rated for stone veneer and suitable for your specific application, whether it’s over concrete or a lath system.
Getting the Perfect Mortar Consistency
Once you have the right product, mixing it correctly is the next critical step. The goal is a smooth, lump-free consistency, often compared to creamy peanut butter. Start by following the manufacturer’s instructions on the bag precisely, as the water-to-mix ratio is key. A common pro tip is to let the mortar “slake” after the initial mix. This means letting it rest for about 5 to 10 minutes, which allows the polymers and cement to fully hydrate. After the rest period, give it a final, brief mix without adding any more water. This process ensures you get the maximum bond strength. Avoid the temptation to add more water to mortar that has started to set, as this will weaken it significantly.
Proper Application: “Buttering” and Dampening the Stone
Proper application ensures a solid, void-free bond between the stone and the wall. The best technique involves applying a layer of mortar to the wall’s scratch coat and also “back-buttering” each individual stone. Back-buttering means spreading a thin, even layer of mortar across the entire back surface of the stone. This method guarantees 100% coverage, eliminating air pockets where moisture could collect and cause problems later. Once the stone is buttered, press it firmly onto the mortared wall with a slight wiggling motion. This helps the mortar key into both surfaces, creating a powerful bond. For a project that stands the test of time, professionals like Pacific Pavers master these techniques to ensure every stone is perfectly set.
Mistake #4: Neglecting Layout and Joint Planning
Even if you’ve got the perfect mortar and flawless application technique, a veneer stone installation can still fall flat if the layout and joint planning aren’t up to par. One of the most common mistakes is skipping the step of dry-laying the stones on the ground before placing them on the wall. Without this preparation, you’re likely to end up with uneven joint spacing, awkward cuts, and repetitive patterns that scream “amateur work.” Uneven joints can create visual distractions, drawing attention to individual stones instead of the overall design. And then there are cross joints – those vertical joints that line up row after row, forming unnatural “ladder” or “zipper” patterns. Not only do these patterns look off, but they also create weak spots that are more prone to cracking or letting moisture seep in. If the joints aren’t staggered between rows, the wall’s structure and appearance both take a hit.
Corners are another area where poor planning can ruin the effect. Uneven or mismatched corners, visible seams, and joints that range from barely-there to overly wide on the same wall can destroy the illusion of full-depth stone. Forcing stones to fit without proper cutting often results in gaps, wobbly stones, and spaces where water can sneak in. Over time, these gaps can lead to issues like efflorescence, freeze-thaw damage, or even the stones detaching completely.
What a Poor Layout Looks Like
According to MSI Surfaces, two of the most frequent problems with DIY stacked-stone installations are “gaps between panels” and “panel corner alignment”. Starting in the middle of a wall instead of at a corner is a recipe for disaster – it forces awkward cuts and misaligned joints at the edges. Another common oversight is failing to plan cuts around features like windows, doors, or outlets, which often leaves fragile slivers of stone that are prone to breaking.
Panelized veneer systems come with their own challenges. One common issue is creating “zipper” seams that zigzag across the wall, ruining the natural stone aesthetic. Inconsistent joint widths can make the wall look chaotic and even trap dirt and moisture. On large, flat surfaces, these mistakes become even more noticeable, emphasizing the need for careful planning to achieve both a polished look and structural soundness.
Planning Your Layout for a Professional Finish
Avoiding these mistakes starts with proper planning. Professional installers swear by dry-laying stones on the ground before applying mortar. This step lets them experiment with patterns, mix stone sizes and colors for a more organic look, and steer clear of obvious repetitive sequences. Starting at a corner or the lowest point of the wall ensures that full stones are placed in the most visible areas, while any necessary cuts are tucked away in less noticeable spots. To keep joints consistent, aim for a width of 3/8 inch to 1/2 inch for most grouted veneers, and use spacers or visual guides throughout the process.
Staggering vertical joints between rows – similar to how bricks are laid – prevents them from lining up directly, which enhances both the strength and appearance of the wall. Mixing stones from multiple boxes or pallets is another pro tip. This prevents color and size variations from forming distinct bands, giving the wall a more natural, random look. For corners, use manufactured corner units if available, or carefully cut and alternate L-shaped or overlapping pieces to hide seams and create the illusion of full-depth stone. Around windows and edges, avoid tiny “sliver” pieces by adjusting the layout or cutting larger stones, ensuring edge pieces are at least a few inches wide.
If you’re in Orange County, CA, hiring an experienced hardscape contractor like Pacific Pavers can make all the difference. Skilled professionals know that a well-thought-out plan from the start minimizes maintenance headaches, extends the life of the installation, and saves you from costly repairs down the road.
Creating a Mock-Up Panel First
Before you commit to covering an entire wall, consider creating a mock-up panel. Think of it as a dress rehearsal for your project. Building a small, 48-by-48-inch sample allows you to see exactly how the stone, mortar color, and joint style will look together in your home’s specific lighting. This is your chance to confirm your design choices and make any adjustments without the risk of costly do-overs. It’s a simple step that professionals use to ensure the final result matches the vision, giving you confidence before the real work begins. You can browse a project gallery to see how different stone and mortar combinations look in completed projects.
Calculating Your Material Needs (With Extra)
To figure out how much stone you need, measure the length and height of the area you plan to cover and multiply them to get the total square footage. If you’re wrapping corners, be sure to measure the linear feet of the corners and subtract one square foot of flat material for every linear foot of corner pieces you’ll use. Always order about 10% to 15% extra material. This buffer covers any cuts, accidental breakage, or mistakes. Running out of stone mid-project can be a major setback, as different production batches can have slight color variations, making it difficult to find a perfect match later on.
Choosing Your Installation Order: Bottom-Up vs. Top-Down
There are two main approaches to installing stone veneer: starting from the bottom and working up, or starting from the top and working down. The bottom-up method provides a solid base to stack stones on, which can feel more stable, especially for beginners. However, it risks smearing mortar on the stones below. Many professionals prefer the top-down method, as it prevents messy mortar drips from staining the finished work. The key to a successful top-down installation is careful planning to ensure the final row at the bottom fits perfectly. The best method often depends on the stone type and your comfort level, but being aware of the pros and cons of each will help you plan your installation effectively.
Tips for Cutting and Shaping Stones
Getting stones to fit perfectly often requires some cutting and shaping. For clean, precise cuts, a circular saw or angle grinder with a diamond blade is your best tool. If you’re aiming for a more rustic, natural edge, you can use a masonry hammer to carefully break pieces. For smaller adjustments, a pair of tile nippers works well to trim edges. The goal is to make your cuts blend in seamlessly. Try to place cut edges against other stones or turn them so they aren’t facing outward. And always prioritize safety—wear protective goggles, gloves, and a dust mask whenever you’re cutting stone.
A Note on Dry-Stack Installations and Safety
The dry-stack look, where stones are fitted tightly together with no visible mortar joints, is incredibly popular for its clean, modern aesthetic. However, it comes with a safety consideration you shouldn’t ignore. The National Concrete Masonry Association (NCMA) warns against using this style in areas where children might be tempted to climb, like on retaining walls or home exteriors. The textured, joint-free surface can create unintended handholds and footholds. If you have young children, it’s important to weigh the visual appeal against this potential safety risk, especially when planning outdoor features.
Understanding the Costs of Stone Veneer Installation
When you’re planning a stone veneer project, one of the first questions that comes to mind is, “How much is this going to cost?” While it’s tempting to look for a simple price-per-square-foot, the reality is a bit more complex. The total cost depends on the type of stone you choose, the complexity of the job, and whether you hire a professional or attempt a DIY installation. Understanding the full financial picture from the start helps you create a realistic budget and avoid any unwelcome surprises down the road. A well-planned budget is just as important as a well-planned layout for ensuring your project is a success from start to finish.
Breaking Down the Expenses
The final price tag for your stone veneer project is made up of several key components. The two largest expenses will almost always be the materials themselves and the cost of labor for installation. However, there are other, smaller costs that can add up, such as preparation materials, permits, and finishing supplies. Breaking down these expenses helps clarify where your money is going and highlights the areas where quality is a non-negotiable investment. Skimping on materials or hiring inexperienced labor might seem like a way to save money upfront, but it often leads to much higher repair costs later on.
Material and Labor Costs
The cost of stone veneer can vary significantly, with manufactured stone typically being more budget-friendly than natural thin-cut stone. On average, you can expect the total installed cost to range anywhere from $10 to $45 per square foot, depending on these factors. For a standard 200-square-foot project, materials alone could cost between $1,400 and $2,000. Labor is the other major variable, with professional installation costs fluctuating based on your location and the intricacy of the design. While labor adds a significant amount to the total, hiring an experienced installer is often the best way to prevent the costly mistakes we’ve discussed.
What’s Often Left Out of an Estimate
A basic estimate might only cover the stone and the installation, but a truly comprehensive project involves more. Don’t forget to account for essential supplies like the weather-resistant barrier, metal lath, mortar, fasteners, and sealants, which can add another $70 or more for every 200 square feet. Other potential costs include demolition of an existing surface, waste disposal fees, and building permits, which may be required in your area. When you get a quote, make sure it’s detailed. A professional contractor, like Pacific Pavers, will provide a transparent estimate that includes all the necessary components, ensuring your Orange County project is built to last without hidden fees.
Mistake #5: Skipping the Final Clean and Seal
Finishing a veneer stone installation goes beyond placing the last stone. Many overlook the crucial step of cleaning and sealing, but skipping this can lead to lasting damage. Mortar smears, construction dust, and leftover debris can tarnish the stone’s appearance and even cause permanent discoloration if not addressed promptly.
Do I Really Need to Clean and Seal My Stone Veneer?
Leaving mortar residue on the stone allows it to harden into a dull film, masking the stone’s natural beauty. Worse, it traps moisture, which can lead to efflorescence – the unsightly white, powdery deposits that can appear on the surface. Without a protective seal, unsealed stone becomes vulnerable to dirt, oil, and organic stains like mold or algae, which are incredibly tough to remove once embedded. In colder climates, water absorbed by unsealed stone freezes and expands, causing surface flaking, spalling, or even loosening stones. Moisture can also seep behind the veneer, leading to mold, wood rot, or insect infestations. Repeated cycles of wetting and drying accelerate wear on softer stones and mortar joints, making proper sealing a must.
How to Properly Clean and Seal Your New Stone
After installation, let the mortar cure for 24 to 72 hours, then sweep away any loose debris. For tougher grime or mortar film, use masonry cleaners designed for stone veneer. Follow the product instructions carefully and rinse thoroughly with clean water. Avoid using harsh household chemicals like bleach, abrasive brushes, or high-pressure washers too close to the surface, as these can damage the stone. Always test any cleaner on a small, hidden area first to ensure compatibility.
Once the surface is clean and dry, and any efflorescence has been removed, it’s time to seal. Choose a penetrating sealer that allows the stone to breathe while protecting it from water and stains. Apply the sealer using a brush, roller, or low-pressure sprayer in thin, even layers, working methodically from top to bottom to avoid drips. Back-brush as needed to ensure even coverage. Most products recommend one or two coats, with a specific timeframe for reapplication. After sealing, keep the area protected from rain, sprinklers, or heavy use while the sealer cures. To check if the sealer is working, observe whether water beads on the surface once fully cured.
Proper Grouting Techniques and Tools
When it comes to grouting, your technique and tools are just as important as the mortar itself. For a clean, professional finish, start by filling a grout bag with a pre-mixed Type S mortar. This tool gives you precise control, allowing you to apply the mortar directly into the joints without smearing it all over the stone faces. Once you’ve filled the joints, wait for the mortar to become “thumbprint hard”—firm enough to hold its shape but still workable. Next, use a jointing tool to compact and shape the grout to your desired depth. This step is key for creating a tight seal that keeps water out. Finally, gently go over the joints with a soft whisk broom to smooth the surface and brush away any loose mortar, giving your project a polished look.
Cleaning Mortar Smears: What the Experts Say
No matter how careful you are, some mortar smears are bound to happen. Cleaning them up properly is a non-negotiable final step. As we’ve noted in our own installation guides, leaving mortar residue creates a dull film that hides the stone’s natural color and texture. It can also trap moisture against the surface, leading to efflorescence. To clean smears effectively, wait until the mortar has cured, then use a masonry cleaner specifically formulated for stone veneer. Always follow the product’s instructions and rinse the surface thoroughly with clean water afterward. It’s important to avoid harsh chemicals, wire brushes, or high-pressure washers, as they can easily damage the stone. A good rule of thumb is to test any cleaning solution on a small, out-of-the-way spot first to make sure it won’t cause discoloration.
Keeping Your Stone Veneer Looking Great for Years
To keep your veneer stone looking its best, inspect it once or twice a year for dirt, stains, or signs of water intrusion. Lightly rinse the surface as needed, and use a pH-neutral cleaner for tougher grime. Professional-grade exterior stone sealers typically last 3 to 5 years under normal conditions, though areas exposed to high UV or coastal environments may require more frequent reapplication. If water stops beading on the surface or the stone appears dull and more absorbent, it’s time to re-clean and reseal. Regular upkeep is far less expensive than repairing damage caused by neglect.
For large installations, hard-to-reach areas, or surfaces already showing signs of efflorescence or staining, hiring a professional – like Pacific Pavers in Orange County, CA – can make all the difference. Professionals can ensure proper cleaning and sealing techniques while addressing any moisture-related issues early, saving you from costly repairs down the line. Taking these final steps not only completes the installation process but also ensures long-lasting beauty and durability for your veneer stone.
Mistake #6: Ignoring Codes and Professional Advice
When it comes to installing veneer stone, adhering to local building codes and structural requirements is non-negotiable. Unfortunately, many homeowners mistakenly believe that a secure-looking installation automatically meets code standards. This assumption can lead to serious problems. Common violations include improper moisture barriers and poor substrate preparation, both of which can result in structural failure, water damage, mold, or even collapse. Beyond the physical risks, ignoring codes can also mean failed inspections, expensive rework, and liability issues if damage affects your property – or your neighbors’.
The Risks of Ignoring Building Codes
One of the most frequent mistakes involves improper clearances. Inspectors often find veneer stone extending all the way to the ground without the required gap. This violates ASTM C1780 standards, which mandate clearance above grade or paving to prevent water damage and freeze-thaw issues. Without this gap, water can seep in, increasing the risk of structural problems. Another common oversight is failing to properly seal penetrations and transitions, such as around light fixtures or vents. Without adequate flashing, these areas become entry points for water.
DIY installations, especially in high-risk areas, carry additional hazards. Many homeowners underestimate the complexity of working with stone veneer, leading to uneven spacing, repetitive patterns, or even structural failures. High-risk scenarios include installations over plywood without a proper cement board backing, near water features or poor drainage areas, or using natural stone with irregular sizes and textures. For example, if water gets behind improperly installed veneer on plywood, the wood can swell, causing the veneer to fail. Fire and clearance requirements around fireplaces, grills, and outdoor fire pits are another critical area where mistakes often occur, leading to potential safety hazards.
When Should You Call a Professional?
Professional contractors bring expertise that goes far beyond what most DIY enthusiasts can manage. They are skilled in substrate preparation, moisture management, selecting the right mortar, and ensuring compliance with building codes. They also know how to evaluate load requirements, ensure proper drainage, and choose materials that suit specific stone types. For example, experienced installers follow ASTM standards, which provide detailed guidelines and diagrams for proper veneer stone installation. This includes ensuring minimum 1½-inch fastener penetration into framing for metal lath and proper lapping to prevent delamination and structural issues.
If you’re in Orange County, CA, hiring a specialized contractor like Pacific Pavers can make all the difference. They have extensive experience integrating veneer stone into outdoor living spaces, such as patios, fire pits, and pool remodels, while ensuring compliance with local codes and HOA requirements. Pacific Pavers follows industry best practices and provides thorough documentation of materials, installation methods, and maintenance recommendations. This not only protects you in case of disputes but also ensures the job is done correctly the first time. Plus, professional contractors carry the necessary licenses and insurance, offering peace of mind throughout the project.
Why a Good Contractor Has a Waitlist
It might be tempting to choose the contractor who can start your project immediately, but a waitlist is often a strong indicator of quality and reliability. The best contractors are in high demand because they have a proven track record of excellent work, positive client reviews, and a deep understanding of their craft. This reputation means they book projects weeks or even months out. A waitlist suggests that a contractor doesn’t rush jobs, uses the right materials, and dedicates the necessary time to every step, from meticulous prep work to the final cleanup. Waiting a bit longer for a sought-after professional is a worthwhile trade-off for the assurance that your investment is handled correctly, avoiding the costly and frustrating mistakes that can arise from hurried or inexperienced work.
How Pacific Pavers Ensures a Perfect Installation
At Pacific Pavers, our reputation is built on a foundation of expert planning and flawless execution, ensuring every veneer stone project sidesteps common installation errors. Our process starts with a thorough site evaluation, creating a detailed plan for surface preparation and moisture management that is specifically suited to Orange County’s climate. We exclusively use high-bond, polymer-modified mortars and insist on a dry-lay process to map out the stone placement, which guarantees a natural, aesthetically pleasing pattern. Our team of skilled installers is rigorously trained to follow all local building codes and ASTM standards, focusing on critical details like proper clearances, flashing, and sealing. Whether we’re crafting an outdoor kitchen or a beautiful retaining wall, our commitment to quality ensures your installation is not only stunning but also engineered to last for years to come.
Your Next Steps for a Flawless Installation
Installing veneer stone correctly requires attention to detail and a step-by-step approach. The six common mistakes discussed earlier often lead to failures like weakened bonds, moisture issues, efflorescence, mold, or even the stone detaching. Each phase of the installation process is connected, so skipping or mishandling one step can compromise the entire project.
The upside? These problems are completely avoidable. A strong and lasting veneer installation begins with a solid, moisture-resistant substrate, the right high-bond mortar, a well-thought-out dry-fit layout, and careful cleaning and sealing. Sticking to manufacturer guidelines and ASTM C1780 standards ensures your work meets building codes and withstands the elements over time.
For more complex projects, professional expertise can make all the difference. Skilled contractors know how to integrate veneer stone into larger designs while addressing substrate conditions, moisture barriers, and local building codes. For instance, Pacific Pavers in Orange County, CA, excels in these types of installations. They combine veneer stone with other outdoor elements like custom pavers and outdoor kitchens, using top-quality materials and conducting detailed inspections to ensure lasting results.
Whether you’re tackling this as a DIY project or hiring a professional, the key principles remain the same: proper preparation, effective moisture control, using the right materials, thoughtful planning, thorough cleaning and sealing, and following all building codes. By sticking to these guidelines, you’ll protect your investment and enjoy a durable, beautiful installation for years to come.
FAQs
How do you properly prepare a surface for veneer stone installation?
Before installing veneer stone, it’s crucial to properly prepare the surface. Start by cleaning the area thoroughly to get rid of dirt, dust, and any loose debris. A clean surface helps create a solid base for the stones. Next, address any cracks or uneven spots by repairing them and ensuring the surface is smooth and level. This might involve applying a layer of mortar or another appropriate material. Lastly, slightly dampen the surface just before installation to enhance the adhesion of the stones. Following these steps will set the foundation for a long-lasting and polished result.
How can I prevent water damage behind my stone veneer?
To avoid problems caused by moisture during veneer stone installation, it’s crucial to focus on drainage. Start by installing a moisture barrier or a weep screed to channel water away from the structure effectively. Avoid attaching veneer to surfaces that might trap water, as this can lead to long-term damage. For extra protection, consider sealing the stone and ensuring there’s good airflow around the installation. These steps can help reduce moisture buildup and keep your project in great condition.
Why should I hire a professional for veneer stone installation?
Hiring an expert for veneer stone installation is key to getting the job done right and safely. Professionals bring the skills needed to handle detailed designs, avoid structural problems, and sidestep mistakes that could lead to costly fixes later on.
They also know how to create a smooth, lasting finish that not only elevates the look of your space but also ensures its durability over time. For more intricate projects, turning to a professional is the smartest way to ensure high-quality results that will hold up for years.
Related Blog Posts
- Complete Guide to Retaining Wall Installation
- Stone Veneer vs. Natural Stone: Key Differences
- Benefits of Veneer Stone for Retaining Walls
- 5 Veneer Stone Benefits for Outdoor Spaces
Key Takeaways
- Prep is Everything: Before a single stone goes up, ensure your wall is clean, sound, and protected with a proper moisture barrier. This foundational work is the single most important step to prevent future problems like peeling stone and water damage.
- Plan Your Pattern and Pick the Right Mortar: Avoid a rookie look by dry-laying your stones on the ground first to create a natural, staggered pattern. Pair this with a polymer-modified mortar—not a standard mix—to guarantee a strong, lasting bond for your veneer.
- Finish Strong with a Clean and Seal: Don’t let mortar smears ruin your hard work. After the mortar cures, clean the surface thoroughly and apply a quality stone sealer. This final step protects your investment from stains and moisture for years to come.
Jeff Tobin is the founder of Pacific Pavers, an award-winning outdoor living company serving Orange County, California. With a 30-person team of ICPI-certified professionals, Jeff specializes in transforming residential and HOA properties through custom paver installations, pool remodeling, and complete outdoor living spaces. His company philosophy—”Flawless craftsmanship. Clear communication. Zero stress.”—reflects his commitment to delivering premium results and exceptional customer experiences. As a BBB-accredited business and Belgard Master Craftsman, Pacific Pavers has become known for process-driven operations and elite craftsmanship in the hardscape industry.
