
A paver base panel is a manufactured layer placed beneath pavers as part of a complete pavement system. It can reduce the amount of conventional aggregate needed in some designs, but it does not eliminate the need to prepare the site, manage water, or follow the product’s installation requirements. For a driveway, the right choice depends on the panel system, soil, drainage, vehicle loads, and the installation details, not the panel alone.
What is a paver base panel?
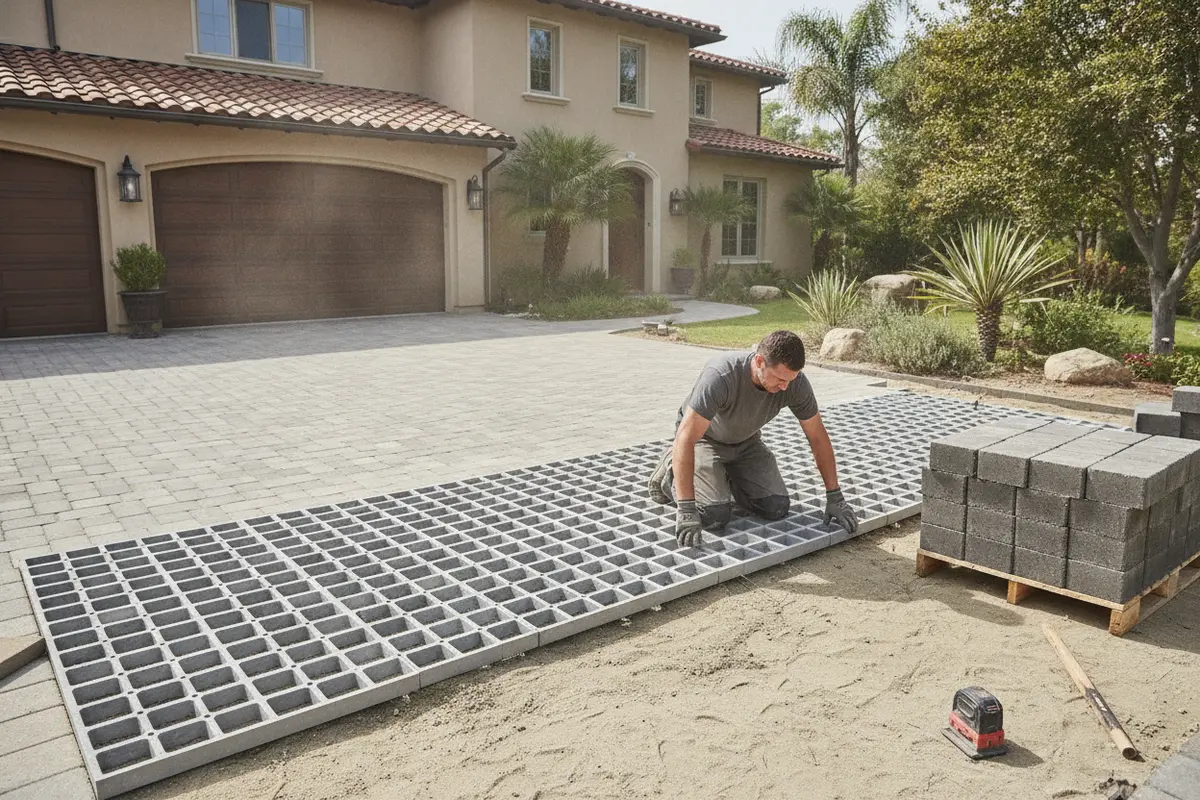
A paver base panel is a purpose-made product installed beneath concrete pavers. Many systems use lightweight, rigid panels, often with a formed or dimpled surface. Individual products differ in material, thickness, connection details, and the way they are intended to work with bedding material and the prepared ground. The manufacturer’s instructions define the approved assembly.
Think of the panel as one layer in a pavement system, not as a finished foundation by itself. Pavers still need a stable, even surface. The ground below must be evaluated and prepared, and the edges need to be held in place. Water needs a suitable route away from the paved area. Depending on the specific product and site, some aggregate preparation may still be required below or around the panels.
Panels are not the same as geogrid or geocell products. Those products have different forms and functions, and they are not interchangeable just because all may be described as ground reinforcement. Ask for the product name and installation specification rather than relying on the general word “panel.”
How does a panel system compare with a traditional aggregate base?
A conventional paver installation commonly uses compacted aggregate as the base layer, with a carefully prepared bedding layer and pavers above. A panel system may replace some of the aggregate depth in an approved assembly. It does not automatically mean that all aggregate can be removed or that excavation, grading, compaction, bedding, and edge restraint can be skipped.
The choice is best made by comparing complete systems. A proposal should describe the materials and sequence from the prepared subgrade to the paver surface. Comparing only the panel’s price or thickness can hide important differences in excavation, aggregate, drainage, labor, and product requirements.
Base materials
Panel system: Specified panel product, with any required aggregate and bedding materials
Traditional aggregate base: Specified aggregate layers, compacted and finished for the paver system
Excavation depth
Panel system: May be reduced in some approved assemblies; confirm total system depth for the site
Traditional aggregate base: Typically reflects the designed aggregate-base depth plus bedding and pavers
Installation steps
Panel system: Requires prepared ground, correct panel placement and joints, specified bedding, and edge restraint
Traditional aggregate base: Requires aggregate placement in planned lifts, compaction, surface preparation, and edge restraint
Driveway suitability
Panel system: Depends on the product’s approved use, loads, site conditions, and installation details
Traditional aggregate base: Depends on the designed section, materials, subgrade, drainage, and workmanship
Cost comparison
Panel system: Consider panels and any required base materials alongside labor, excavation, delivery, and detailing
Traditional aggregate base: Consider aggregate quantity and handling, excavation, compaction, labor, delivery, and detailing
Key question
Panel system: Does this exact product have installation guidance for this site and intended vehicle use?
Traditional aggregate base: Are the base depth, material, compaction plan, and drainage suitable for this site?
Neither column is a universal answer. The appropriate system is the one that can be specified and built for the actual subgrade, water conditions, intended use, and paver layout. The Concrete Masonry & Hardscapes Association (CMHA) provides broader hardscape-industry resources at its website; for a panel, consult the product manufacturer’s current installation instructions as well.
When comparing the two approaches, separate the design question from the material question. A panel changes the composition of an approved base assembly; it does not by itself establish how deep the project should be excavated or how the surface will perform. A conventional base also is not a complete design until the soil, drainage, edge conditions, and expected use are considered. Ask both bidders to describe those same site assumptions so the comparison is meaningful.
It may help to review a sample cross-section, even a simple drawing. Trace upward from the soil and identify each layer by name. If one proposal shows compacted aggregate and another shows panels with a smaller aggregate layer, request the reason for each arrangement and the product documentation behind the panel option. The goal is not to decide from a diagram alone; it is to make sure the layers, elevations, and site conditions tell a coherent story.
When might a paver base panel be worth considering?
A panel system may be worth discussing when the manufacturer’s documentation supports the intended application and the project team can prepare the site and install the whole assembly as specified. Homeowners may also want to compare a panel option when excavation depth, access, or material handling is a meaningful design constraint. Those factors are prompts for evaluation, not proof that a panel is automatically faster, cheaper, or better.
For a driveway, load and movement matter. Passenger vehicles create a different demand from occasional foot traffic, and heavier vehicles or frequent turning can add stress at specific areas. The design should account for how the driveway will actually be used, including parking locations, the route vehicles take, and any service or delivery access. Ask the installer to confirm that the selected product and the entire assembly are appropriate for that use.
Panel options are also worth comparing when a project has a defined elevation or transitions to other hardscape. The panel’s thickness is only part of the calculation: the pavers, bedding, base layers, and adjoining surfaces all affect the final elevation. A site review can reveal whether there is enough room to make smooth transitions at a garage, walkway, gate, steps, or street connection.
Consider a sloped drive that meets a garage slab and a side walkway. The question is not merely whether a panel is thin; the designer must fit every layer while maintaining the intended finished grade at both connections. If the assembly changes the total build-up, that can affect the excavation needed, the location of the driveway edge, and the way water travels. A section sketch and elevations at those transition points help expose conflicts before work begins.
If the project includes a broader outdoor renovation, coordinate the driveway base decision with the full plan. The outdoor living and hardscape services overview can help frame how a driveway relates to other planned work. For a driveway-specific scope, see paver driveway installation.
What site conditions should be checked first?
Subgrade: The soil below the base influences how the surface performs. The project team should look at the existing ground, whether it is firm or disturbed, and whether there are areas that need additional preparation. A panel cannot correct a poorly prepared or unsuitable subgrade simply by covering it.
Drainage and slope: Water should not be trapped beneath or directed toward the home, garage, or neighboring property. Review the existing slope, drainage paths, downspouts, and low spots. Ask how the finished surface will shed water and how the design connects to existing drainage features. A product’s drainage-related features do not replace a site-specific plan.
Edges and transitions: Pavers need stable perimeter restraint designed for the installation. Discuss how edges will be secured at the driveway entrance, garage, planting beds, and side transitions. Also confirm how the finished surface will meet existing concrete, gates, and walkways. These details affect both the appearance and the durability of the installation.
Loads and movement: State what will use the driveway. Include routine passenger vehicles, and mention if heavier vehicles, trailers, or frequent deliveries are expected. Clarify where vehicles turn or park. The product’s published use guidance and the site design should align with these conditions.
Existing conditions: Buried utilities, tree roots, old pavement, irrigation, and limited access can change the preparation plan. Identify known constraints early and ask how the contractor will verify or work around them. Avoid assuming that a thin panel makes every obstacle or elevation issue disappear.
A useful site walk-through follows the path water and vehicles will take. Start at the street and note where runoff enters or leaves the driveway. Look at the garage threshold, adjacent paving, planting beds, and any low point where water could collect. Then trace vehicle movement: where does a car turn, stop, or reverse? These observations give the contractor a concrete basis for discussing edge details, transitions, and areas that may need special attention.
Also clarify what is known and what still needs verification. For example, the homeowner may know where irrigation lines were installed but not their exact depth. Existing concrete may conceal a previous repair, and an old paved surface may hide the condition of the soil beneath it. Ask how those unknowns will be handled if they affect excavation or the proposed assembly. A clear approach to uncertainty is more useful than assuming every hidden condition can be predicted from a surface inspection.
How should you compare panel products and proposals?
Start with product identification. Ask for the exact manufacturer and product name, the current installation instructions, and any published limitations relevant to the proposed use. Confirm whether the instructions cover driveway applications and the anticipated vehicle loads. If the documentation does not clearly answer a question, request clarification before approving the specification.
Next, ask for the full layer sequence in writing. It should explain what happens from the existing soil upward: any subgrade preparation, aggregate layers, panel placement and connections, bedding material, pavers, and edge restraint. The answer should make clear whether aggregate remains part of the system and where it is used. “Panel base” by itself is not enough detail to compare two proposals.
Then review the scope. Look for excavation and disposal, material delivery, preparation and compaction steps, grading, drainage work, edge details, and how transitions will be finished. Ask which items are included and what site conditions could change the work. A lower material quantity does not necessarily mean a lower total project cost, because labor, access, disposal, and drainage can differ.
To compare cost responsibly, request the total installed price for equivalent project boundaries and the same paver selection. Note whether the proposal includes demolition, excavation, hauling, base materials, panels, bedding, edge restraints, drainage changes, and cleanup. Do not compare a panel-only allowance with an installed conventional base. For a broader view of cost variables, use the paver driveway cost guide as a planning resource, then confirm the project-specific scope with a contractor.
A simple side-by-side worksheet helps prevent a misleading price comparison. Put each proposal in a column and list the same line items in each: demolition, excavation and disposal, subgrade preparation, base materials, panel product if applicable, bedding, pavers, restraints, drainage work, transitions, and cleanup. Mark an item “not stated” when the scope is silent; do not assume that it is included. Then ask the contractor whether the omission is intentional, excluded, or dependent on conditions discovered during work.
Compare quantities and assumptions as well as line-item labels. A proposal might include excavation but not say how the disposal volume was estimated, or list a panel without identifying the matching installation materials. Ask what project boundary the price covers and whether the same driveway area, paver selection, and access assumptions are used in both bids. This is a fairer comparison than treating a low total as proof that a system is less expensive.
Finally, ask how the installer will verify the work as it progresses. Helpful checkpoints may include the prepared subgrade, base elevations and slope, panel placement, and edge restraint before the pavers conceal those layers. A clear sequence helps you understand what is being installed and gives you a chance to resolve questions before the surface is complete.
What does a careful installation sequence look like?
The exact order and materials vary by product and site, but a clear sequence makes it easier to judge whether the proposal is complete. First, the installer confirms the layout, finished elevations, access, and known site conditions. The excavation area and depth are then set to accommodate the designed layers and finished surface. That depth should account for the actual paver thickness, bedding layer, panel, any aggregate, and connections to adjacent surfaces.
Next, the exposed ground is evaluated and prepared. The installer addresses unsuitable or disturbed areas as needed and establishes the planned grade. Any aggregate required by the selected system is placed and prepared according to the specification. Panels, if used, are then positioned in the prescribed direction and pattern, with joints and edges handled as the manufacturer requires. The bedding layer and pavers follow the documented sequence, with perimeter restraints and transitions built into the work rather than left as an afterthought.
Water management should be considered throughout the process, not added as a final patch. The planned grade should work with the property’s existing drainage conditions, and the finished driveway should not create an unintended path toward a structure or neighboring area. Where the site has difficult slopes, low points, or drainage conflicts, ask how the design addresses them before construction starts.
Before each layer is covered, confirm what will be checked. The project team can verify the planned elevations, surface preparation, panel placement, and edge details at the appropriate stages. You do not need to direct technical work, but it is reasonable to ask how the installer will confirm the sequence follows the chosen product’s guidance. Clear checkpoints help keep a hidden component from becoming an unresolved question after the pavers are down.
For example, before panels are covered, confirm that the installed product matches the specification and that the layout follows the manufacturer’s directions for joints, orientation, and perimeter conditions. Before the pavers go down, the installer can check whether the planned grades and edges remain consistent with the drawing. These are not substitute inspections or a request for the homeowner to supervise construction. They are practical moments to ask questions while the work is still visible and easier to discuss.
Ask what records or updates you can expect at these stages. The most useful update identifies what was completed and what comes next, rather than simply saying that the base is finished. If the crew finds a condition that changes the plan, ask for an explanation of the condition, the proposed response, and any effect on the scope before the next layer conceals the area. This keeps decisions tied to observable site conditions and the agreed installation details.
What questions should you ask before approving the plan?
- What exact panel product is specified, and can I review its current installation instructions?
- Does the manufacturer support this product for a driveway and the vehicle use I described?
- What layers will be installed beneath and above the panels, including any aggregate and bedding?
- How will the soil, slope, drainage, and existing elevations be evaluated and addressed?
- How will the driveway edges and transitions be restrained and finished?
- What excavation, hauling, materials, and installation steps are included in the proposal?
- What site conditions could change the scope, and how will those changes be discussed?
- What checks will happen before the base layers are covered by pavers?
Ask for clear answers tied to your site rather than a general claim that one base is always superior. A well-prepared proposal connects the selected product, installation method, and site conditions in a way you can review.
One way to test the clarity of a proposal is to explain the plan back in your own words: “This is the named panel, it sits over these prepared layers, the driveway is graded this way, and these edges meet the garage and walkway like this.” If you cannot follow the sequence from soil to finished surface, ask for a drawing or a more specific written description. That conversation can also reveal whether two bids are based on different assumptions rather than competing solutions to the same plan.
How does a panel decision fit into a complete driveway design?
The base is important, but it is one part of a driveway that also needs a functional layout and a coordinated finish. Consider the route from the street to the garage, the parking area, pedestrian access, and connections to the rest of the property. Paver size, pattern, color, borders, and the transition to existing hardscape all influence the final result.
If you are planning a patio or another paved area at the same time, make sure the elevation and material decisions are coordinated. The paver patio service page describes a related outdoor surface, while the concrete design page may be relevant where the plan includes concrete work. For design planning, review the company’s 2D and 3D design services and bring your layout questions to the conversation.
Homeowners considering work near a pool can also review the paver pool deck information to understand that adjacent surfaces may have different design considerations. Keep the project scope clear: a driveway base product should be chosen for its own application, not assumed to suit every paved area.
Coordination matters even when the driveway is the only surface being replaced. The finished elevation affects how the driveway meets the garage, public approach, and nearby walking routes. The pattern and border can also influence where cuts and edges fall. Settle those layout decisions alongside the base discussion so the product choice supports the intended surface rather than dictating a last-minute adjustment.
What is the practical takeaway?
A paver base panel can be a useful option when the specific product, site, loads, and complete installation method align. It is not a shortcut around soil preparation, grading, drainage, edge restraint, or the manufacturer’s instructions. Compare a panel proposal with a conventional aggregate proposal by looking at the full installed assembly, not just the panel or the quantity of stone.
Before deciding, gather the product specification, proposed layer sequence, site-preparation plan, drainage approach, and itemized scope. If you are planning a substantial driveway or a broader backyard renovation, you can request a design consultation and call Pacific Pavers at (714) 718-3970 to discuss the project.
Call to discuss your driveway project
Frequently asked questions
Can paver base panels replace all of the aggregate?
Not necessarily. The approved layer sequence depends on the specific product and site. Some systems may reduce aggregate depth, while still requiring aggregate or other preparation. Follow the manufacturer’s instructions and confirm the complete assembly with the installer.
Are paver base panels suitable for a driveway?
Suitability depends on the exact product, its published application guidance, the vehicle loads, subgrade, drainage, and installation. Ask for documentation that supports the intended driveway use rather than assuming that a product used under a walkway is appropriate for vehicles.
Will a panel system always cost less?
No. The panel price is only one part of the installed cost. Excavation, base materials, handling, labor, drainage, edge restraint, and access all affect the total. Compare proposals with the same project boundaries and included work.
Do panels solve drainage problems?
No panel should be treated as a substitute for a site-specific drainage plan. Slope, water flow, soil, downspouts, and nearby structures need to be considered together. Ask how water will move across and away from the finished driveway.
What should I review before signing a proposal?
Review the product name and instructions, intended use, full layer sequence, subgrade and drainage plan, edge details, included scope, and any conditions that could affect the work. Ask for clarification anywhere the proposal uses only a broad phrase such as “panel base.”
A sound decision comes from matching a documented system to the site and comparing complete installation plans, not from choosing a base by name alone.

Jeff Tobin is the founder of Pacific Pavers, an award-winning outdoor living company serving Orange County, California. With a 30-person team of ICPI-certified professionals, Jeff specializes in transforming residential and HOA properties through custom paver installations, pool remodeling, and complete outdoor living spaces. His company philosophy—”Flawless craftsmanship. Clear communication. Zero stress.”—reflects his commitment to delivering premium results and exceptional customer experiences. As a BBB-accredited business and Belgard Master Craftsman, Pacific Pavers has become known for process-driven operations and elite craftsmanship in the hardscape industry.