
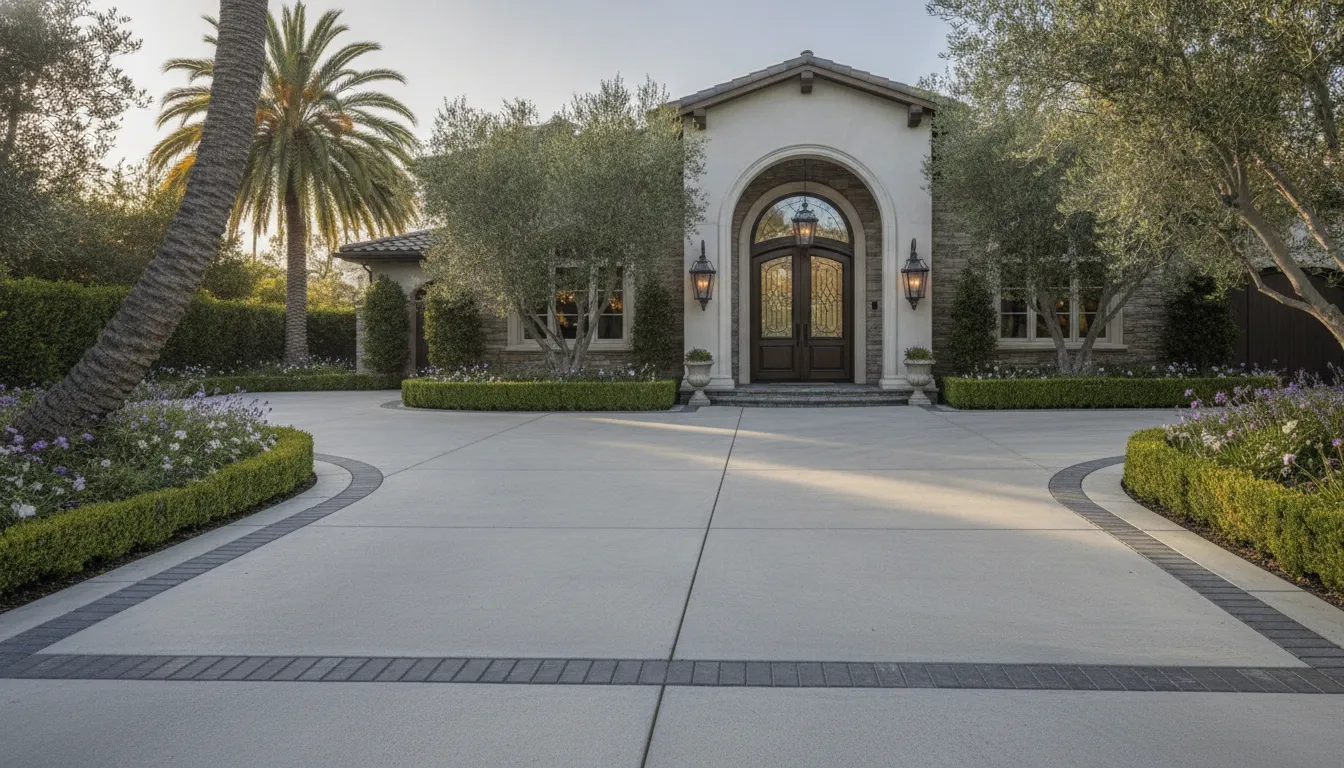
A large driveway does more than accommodate vehicles. It sets the visual scale for the front of your Orange County home, shapes how guests arrive, and influences how water moves across the property. When concrete and pavers are designed together, the result can feel intentional rather than oversized or pieced together.
Get Your Complimentary Design Consultation
A large concrete driveway with paver border works best when its proportions, turning areas, joints, drainage, and material transitions are planned as one system. The right design depends on the home, site conditions, vehicle movement, and architectural style. So dimensions and construction details should be confirmed through a site-specific assessment rather than copied from a template.
Start by evaluating how the driveway relates to the home, garage, walkways, and landscape edges. That relationship determines whether the space feels balanced before material colors and patterns enter the conversation.
What Makes a Large Driveway Feel Proportional?
A large driveway should feel like part of the property, not an oversized slab placed in front of it. Proportion comes from the relationship between the driveway, the home facade, the entry approach, and the landscape around them. A broad front-entry drive may need a different visual treatment than a circular driveway or an estate-style approach, even when both serve similar vehicles.
Start with the architecture and approach
Look at the strongest lines of the home before choosing the driveway layout. Rooflines, columns, garage doors, retaining walls, and the main entry can all guide the direction of the paving pattern and border. A long approach may benefit from a restrained rhythm that leads the eye toward the house. A circular layout needs a clear center and an outer edge that feels intentional from both the street and the front door.
The entry sequence matters as much as the final surface. Drivers should be able to understand where to enter, where to turn, and how to reach the garage without the driveway visually competing with the architecture. If the drive connects to a walkway, align those paths so the pedestrian route feels designed rather than added afterward. A coordinated paver entryway can help connect the driveway, sidewalk, and front door while giving each route a distinct purpose.
Use borders, planting, and rhythm to control scale
On a large concrete driveway with paver border, the border should support the overall scale instead of looking like a narrow outline around an expansive field. Its width, color, pattern, and relationship to the home should be selected as one composition. A modest border may suit a simple facade, while a more substantial architectural setting may call for stronger bands or a carefully placed accent pattern. These are design decisions, not universal measurements.
Planting edges also affect perceived size. Layered planting, low walls, or defined beds can soften a broad paved area and create visual boundaries. The goal is not to hide the driveway, but to give the eye places to pause. Repeating a material or color from the entry, walkway, or landscape wall can create rhythm without covering every surface in competing patterns. Homeowners comparing Orange County driveway design options should evaluate the entire approach, not just isolated samples.
Design for movement as well as appearance
Proportion is ultimately functional. Leave enough visual and physical room for the intended vehicle paths, garage access, guest parking, deliveries, and pedestrian movement. Large properties often need more than one circulation pattern, so the layout should be reviewed from the driver’s seat and from the street. Site-specific dimensions, grading, and turning needs should be confirmed during professional design rather than assumed from a generic plan. When scale, circulation, architecture, and planting work together, a substantial driveway can feel calm, balanced, and deliberately tailored to the home.
How Should You Plan Vehicle Turning and Parking Areas?
A successful driveway layout should make everyday arrivals feel natural, not force drivers to correct their path at the garage or across a planting bed. Begin by tracing how vehicles actually approach the property: where they enter from the street. How they align with the garage, where a second vehicle may wait, and how they leave. A large driveway may support a front-entry, circular, or estate-style approach, but the right arrangement depends on the lot, home orientation, slope, existing trees, and surrounding hardscape.
Map the movement before choosing the finish
Study the path from the street to each garage bay and identify points where a vehicle would need to turn, reverse, or pass another car. Garage doors should feel like the destination of the layout rather than an afterthought. Mark guest parking separately from the main approach so parked vehicles do not narrow the route used by household cars. For a larger Orange County property, this may mean creating a defined parking court. A widened arrival area, or a turning zone that keeps visitors from backing toward the sidewalk.
Also account for occasional users. Delivery vehicles, moving trucks, waste collection, and service providers may need a clearer path than a passenger car. Utility access matters too. Avoid placing permanent borders, raised planters, walls, or decorative features where they could obstruct equipment access or make maintenance difficult. The goal is not simply to maximize paved area. It is to organize each movement so the driveway remains comfortable and visually composed.
Separate vehicles from people
Pedestrian circulation deserves its own review. A walkway from the driveway to the front entry should be obvious, stable, and easy to reach without requiring someone to cross an active turning path unnecessarily. Consider where children, guests, and residents will step out of parked cars, and preserve sightlines near the sidewalk, gate, and front door. Landscape edges and paver borders can help define these zones, but they should reinforce safe movement rather than create abrupt obstacles.
Review the plan on the actual property before finalizing the design. A drawing can show the intended geometry, but an on-site assessment reveals slopes, curb conditions. Existing concrete, drainage patterns, tree roots, and the true relationship between the street and garage. Pacific Pavers describes its consultation process as including property measurements and an assessment of the space and homeowner’s vision. That site-specific review is especially valuable when coordinating a custom paver driveway installation with concrete, walkways, or landscape improvements.
How Does a Large Concrete Driveway With Paver Border Work?
Yes. A concrete driveway with a paver border can feel intentional rather than pieced together when the two materials share a clear design relationship. Pacific Pavers coordinates concrete driveways with paver installations, including custom color, texture, and stamped patterns. The goal is not to make the materials look identical. It is to give each one a defined role while keeping the approach connected to the home’s architecture.
Start with the visual relationship between the driveway field and the border. A closely related paver tone can create a quiet, tailored frame around the concrete. A stronger contrast can make the edge more visible and help define the driveway against planting beds, walkways, or the street. Sample the materials beside the home’s exterior, masonry, roof tones, and landscape colors. A color that looks balanced in a showroom can read very differently across a large driveway in full sun.
| Decision | What to consider |
|---|---|
| Color | Use a related tone for a seamless frame, or a deliberate contrast for stronger definition. Test samples on site. |
| Border scale | A narrow edge may suit a compact approach. A larger driveway often needs a broader, more substantial frame so the border does not disappear visually. |
| Vehicle loads | Select pavers, bedding, restraint, and installation details appropriate for areas crossed by vehicle tires, including turning zones. |
| Transition | Plan the concrete-to-paver line as part of the layout, especially at curves, width changes, garage entries, and connections to existing pavement. |
Get Your Complimentary Design Consultation
Make the border structural, not only decorative
The visible paver band is only one part of the assembly. Edge restraint helps hold the paver system in place, while the base beneath both materials must be prepared for the site’s soil, drainage, and expected use. The transition also needs careful planning because concrete and pavers can respond differently to movement, moisture, and seasonal conditions. Concrete joint placement should support the slab layout rather than leaving random cracks to determine the visual pattern. The Federal Highway Administration explains that joints can control cracking and isolate structures that move differently, making their locations an important part of concrete design: FHWA guidance on concrete pavement joints.
At the driveway edge, avoid treating the paver border as an afterthought. Its width, pattern direction, restraint, and relationship to drainage should be resolved before installation begins. For a large driveway, a substantial border can frame the entry and visually organize broad areas of concrete. But the final scale should respond to the home, turning movements, garage alignment, and landscape edges. For more context on concrete paver material options, compare the full system rather than judging either surface by appearance alone.
Where Do Expansion Joints and Drainage Belong?
A large driveway needs more than an attractive surface. Its concrete field, paver border, adjacent walks, garage approach, landscape edges, and existing pavement all respond to loads, temperature, moisture, and soil movement. Planning joints and drainage together helps the finished installation perform as one coordinated system instead of leaving cracks or runoff to determine the layout.
Use joints to manage movement and cracking
Concrete joints are intentional lines that help control where movement and cracking occur. The Federal Highway Administration identifies joint functions that can include controlling cracks, transferring loads, isolating structures that move differently, and separating pavement areas. It also notes that placing joints in appropriate locations is essential to preventing random cracking. Read the FHWA technical advisory on concrete pavement joints for the underlying engineering guidance.
For a residential driveway, joint placement should respond to the actual geometry rather than follow a decorative grid. Width changes, corners, narrow connections, and transitions to existing concrete deserve particular attention. A municipal driveway detail, for example. Illustrates the general concept of using contraction joints in wider driveway areas and an expansion joint where new concrete connects to existing concrete. That document is an example from another jurisdiction, not a Pacific Pavers specification or Orange County code requirement.
Likewise, Wisconsin DOT guidance discusses aligning new joints with existing joints or cracks and considering joints at width changes. These references can help explain the design logic, but they should not be treated as universal residential spacing rules. The final layout depends on slab geometry, thickness, reinforcement decisions, adjoining materials, site conditions, and the professional design for the property.
Plan the water path before choosing drains
Drainage begins with grading. The design team needs to understand where water currently collects, how the driveway meets the garage and public approach, and which areas must remain protected from runoff. Depending on the site, water may be directed toward an approved collection point. Intercepted by a drain, guided along an edge, or allowed to move toward a suitable pervious landscape area. A drain is not a substitute for a coherent surface slope and discharge plan.
Stormwater guidance from the District of Columbia identifies options such as directing runoff to pervious areas, infiltration practices, rain gardens, stormwater planters, or storage and reuse. It also identifies available space, soil permeability, and soil compaction as important constraints. These principles apply broadly, but the right solution for an Orange County property still requires site-specific assessment. Especially where slopes, compacted fill, coastal conditions, existing drains, or neighboring properties affect the water path.
Before construction, review grading, soil, transitions, and drainage with the same care given to the border pattern. Pacific Pavers can coordinate concrete work with paver installations, while its custom paver driveway installations are planned around both appearance and function. The result should look deliberate from the street and direct water responsibly for the conditions on that particular site.
What Should You Plan for Installation and Long-Term Care?
A successful large concrete driveway with paver border depends on decisions made before the first load of concrete arrives. The visible finish matters, but the underlying preparation, transitions, and care plan determine how confidently the driveway performs over time. A qualified professional should confirm site-specific grading, drainage, reinforcement, joint layout, and material requirements rather than applying a one-size-fits-all specification.
- Prepare and compact the foundation. The installation team should establish the required elevations, address holes or depressions, and compact the foundation so it is stable before placing the driveway. Forms must fit the planned layout and leave enough working room for placement and finishing. Wisconsin Department of Transportation guidance likewise emphasizes preparing and compacting the foundation, then checking the foundation, forms, stringline, and reinforcement before concrete placement: review the construction reference for the general principle.
- Confirm reinforcement and joint decisions. Reinforcement is not a decorative add-on, and its use, placement, and design should be determined by a qualified professional based on the site and project requirements. The same applies to control and expansion joints. Joints can help control cracking, transfer loads, and separate elements that move differently. The Federal Highway Administration notes that placing joints in appropriate locations is essential to reducing random cracking, especially where the layout changes or new concrete meets existing work. Those decisions should be coordinated with the paver border and any adjacent walks, garage slab, apron, or entry surface.
- Build clean transitions and edge conditions. A paver border should be integrated into the overall base and edge-restraint plan, not installed as a thin decorative strip after the main work is complete. Review how the concrete meets pavers, landscape beds, sidewalks, drains, and existing pavement. Transitions should support safe movement and direct water where the site plan requires it. The border material and installation method also need to suit the vehicle loads expected in that area.
- Protect the new work while it cures. Concrete needs appropriate curing and protection after placement. Keep the surface free from premature traffic, construction debris, and incompatible cleaning products during this stage. The installer should explain when the driveway can be used and which conditions require additional care. Do not assume that a decorative finish, paver border, or sealant has the same curing requirements as another material.
- Clean and seal only when appropriate. Ongoing care should follow the selected concrete finish, paver material, joint system, and manufacturer guidance. Some surfaces may benefit from sealing, while others may not need it or may require a particular product and preparation method. Avoid treating sealing as an automatic annual task. For practical guidance on cleaning, joint sand, and sealing decisions for paver areas, see paver cleaning and sealing.
- Inspect the completed driveway. Before final acceptance, walk the entire installation with the project team. Check the border alignment, transitions, drainage behavior, finish consistency, joints, edges, and any areas where concrete meets existing construction. Ask what changes to watch for and how to report movement, settling, drainage concerns, or surface damage. Clear communication at handoff makes long-term care more straightforward and gives the homeowner a documented understanding of the finished work.
How Can an Orange County Design Consultation Reduce Risk?
A large driveway affects more than the parking area. It shapes the arrival sequence, influences how water moves across the property, and must work with the home’s architecture, landscape, garage access, and pedestrian routes. A design consultation gives these factors attention before construction begins, when changes are easier to evaluate and resolve.
The process can begin with an on-site assessment of existing conditions. That review may include grades, drainage patterns, slopes, connections to existing concrete, landscape edges, and the practical path vehicles will take into and out of the property. Grading and drainage deserve particular care in Orange County. Where a driveway must be planned around the site’s existing elevations and applicable project requirements rather than a one-size-fits-all slope or drain layout.
Review the details before materials are ordered
A coordinated design also clarifies how the concrete field and paver border will relate to each other. Pacific Pavers can prepare 2D construction plans to communicate layout, transitions, and important site details. Three-dimensional renderings can then help homeowners review the overall scale, pattern, color, and relationship to the house before installation. Material samples make that review more tangible, especially when concrete color or texture needs to complement pavers, masonry, stucco, or existing landscape materials.
The design service includes up to three revisions, giving the homeowner a defined opportunity to refine the concept. That can be useful when a border feels too narrow for the driveway’s scale. When a turning area needs reconsideration, or when the preferred materials do not create the intended visual balance. The stated timeline for design delivery is 12-14 days from consultation to delivery. This is the documented process timeline, not a promise that applies to every site or project circumstance.
Coordinate with the HOA when required
For properties governed by an HOA, early coordination can reduce avoidable surprises. Community preferences, review procedures, material expectations, and architectural standards may affect the proposed driveway. Bringing those considerations into the design conversation helps establish what must be submitted or confirmed before construction planning advances. It also gives the homeowner clearer information to share with a board or manager.
For qualified projects over $30,000, Pacific Pavers offers a complimentary $6,500 design package. Eligibility and package details should be confirmed through the Orange County design consultation page. The goal is not to force a template onto the property. But to make the major functional and visual decisions clear before the first section of concrete or pavers is installed.
Get Your Complimentary Design Consultation
Frequently Asked Questions
Can I lay a paver border on a concrete driveway?
Yes, concrete and pavers can work together when the transition, base, edge restraint, and vehicle-load requirements are designed as one system. The border should be coordinated with the driveway’s grade, thickness, drainage plan, and adjacent surfaces rather than treated as a decorative strip added afterward. A qualified installer can also help determine whether a contrasting color, matching tone, or coordinated pattern best fits the home’s architecture.
How wide should the paver border be on a large driveway?
There is no universal width that fits every property. A border that looks balanced on a narrow drive may disappear beside a broad estate-style approach, while an oversized border can compete with the home’s facade. Evaluate the driveway in relation to the entry, garage, landscape beds, walkways, and turning areas. A scaled plan or rendering makes it easier to compare one-row, multi-row, and wider border options before installation.
Where should joints and drainage be planned?
Joint locations should respond to the driveway’s shape, width changes, transitions, and existing concrete so cracking is managed rather than left to chance. Drainage should be reviewed at the same time, with grading and collection or infiltration features selected for the property’s soil, available space, and runoff pattern. These decisions are site-specific, so a professional assessment is more reliable than applying a fixed spacing or slope to every Orange County property.
How do I maintain concrete and pavers together?
Keep both surfaces clear of debris, address stains using methods appropriate for the specific finish, and inspect the border and joints for movement, settlement, weeds, or drainage issues. Cleaning, joint-sand replacement, and sealing should follow the installed materials and manufacturer guidance. Have small problems evaluated early, especially where vehicles cross the transition, because timely maintenance can help protect the appearance and performance of the complete driveway system.
Ready to Plan Your Driveway Design?
A thoughtful design consultation can help coordinate your concrete surface, paver border, circulation, and home’s overall appearance before installation begins. Request a design consultation with Pacific Pavers to discuss your project. Qualified projects over $30,000 may be eligible for the complimentary $6,500 design package; eligibility and details are confirmed during the consultation process.

Jeff Tobin is the founder of Pacific Pavers, an award-winning outdoor living company serving Orange County, California. With a 30-person team of ICPI-certified professionals, Jeff specializes in transforming residential and HOA properties through custom paver installations, pool remodeling, and complete outdoor living spaces. His company philosophy—”Flawless craftsmanship. Clear communication. Zero stress.”—reflects his commitment to delivering premium results and exceptional customer experiences. As a BBB-accredited business and Belgard Master Craftsman, Pacific Pavers has become known for process-driven operations and elite craftsmanship in the hardscape industry.